Flare-On 11 Writeup: Challenge 7 - Native Ahead Of Time .NET and ECDH Cryptanalysis
2024-11-09

This challenge is indeed a .NET binary, but it is not a conventional .NET sample, so standard .NET decompilers will not be effective. I divided the challenge into three stages. The first stage focuses on reverse engineering a Native Ahead of Time (AOT) .NET binary. The second stage involves cryptanalysis of the Elliptic Curve Diffie–Hellman (ECDH) algorithm to recover the secret key. The final stage consists of extracting encrypted messages from captured data and performing a replay attack using the same secret key to recover an exfiltrated flag.
If you’re interested in learning more about how to reverse engineer conventional .NET samples, feel free to check out my blog here.
Stage 1 - Reversing Native AOT .NET
1.1 The Start Line
The prompt for the challenge mentioned .NET, but Detect It Easy identifies it as a natively compiled program with the compiler listed as Microsoft Visual C/C++ (2022+). Decompilers for .NET, like dnSpy, are unable to decompile it. This raises the question: could it be a packed .NET binary or something else entirely?
Upon loading the file into IDA, it discovered more than 6,000 regular (unrecognized) functions. After checking for signs of packers, I concluded that it was not packed—this is good news, right? However, annotating that many functions one by one would be incredibly time-consuming, so I needed to choose a different approach.
It is crucial to understand what you are dealing with before investing too much unnecessary time and effort in solving the problem. I found a couple of clues that guided my search, such as the presence of the DotNetRuntimeDebugHeader in the Export Directory and sections labeled .managed and hydrated. Your favorite research engine can direct you to resources about a new deployment model introduced with .NET 7: Native Ahead Of Time (AOT). I have also found a great blog that you might find helpful for further reading here.
1.2 IDA FLIRT Signatures
FLIRT, which stands for Fast Library Identification and Recognition Technology, enables IDA to recognize standard library functions by matching their signatures. While IDA provides signatures for common libraries, I had to create my own because IDA did not include available signatures for natively compiled .NET at the time of the CTF.
1.2.1 Native AOT .NET
To generate library function signatures, you need to identify the library used by the binary, build a donor sample to extract labels, and create the signatures.
This blog would have been too long if I had to present all the steps for generating signatures. Fortunately, there are excellent resources that cover this process in depth. In fact, I found helpful instructions in this blog from HarfangLab, which saved me a lot of time. So feel free to read the blog before proceeding with the next steps.
Download and Install .NET SDK
You can determine the .NET runtime version of a binary by examining the string within it: 8.0.524.21615\8.0.5+087e15321bb712ef6fe8b0ba6f8bd12facf92629. You can find the related Git commit here. The .NET Runtime v8.0.5 release is available on the dotnet GitHub repository. This release includes three versions of the .NET SDK: v8.0.105, v8.0.205, and v8.0.300. I chose the latest version of .NET SDK from that set.
To find any version of the .NET SDK—both currently supported and out-of-support—visit this link. Select .NET 8.0, and it will redirect you to this download page. Look for version 8.0.5, and download the SDK 8.0.300 to install it.
Build A Donor Binary
You can follow HarfangLab’s blog to build a binary using Visual Studio. However, I prefer using the command line since the commands can be integrated into a script for automation. Below is the list of commands I used:
dotnet new console --aot -o AOT-symbols-donor
cd AOT-symbols-donor
# Modify content of Program.cs
dotnet publish -r win-x64 -c Release
Note: I used this source code to build the donor. If everything works as expected, you shouldn’t have to change any configuration in the project. However, if you want to be cautious, you can check the file OAT-symbols-donor.csproj to confirms that it contains <TargetFramework>net8.0</TargetFramework> and <PublishAot>true</PublishAot> before running the command dotnet publish.
Make And Apply Signatures
You can generate FLIRT signatures using the donor binary along with its .pdb file. While the signatures I generated do not cover all possible library functions, they can still be improved. They provide adequate labels for starting your analysis of the binary. Below is a comparison of the IDA decompiler before and after applying the signatures:
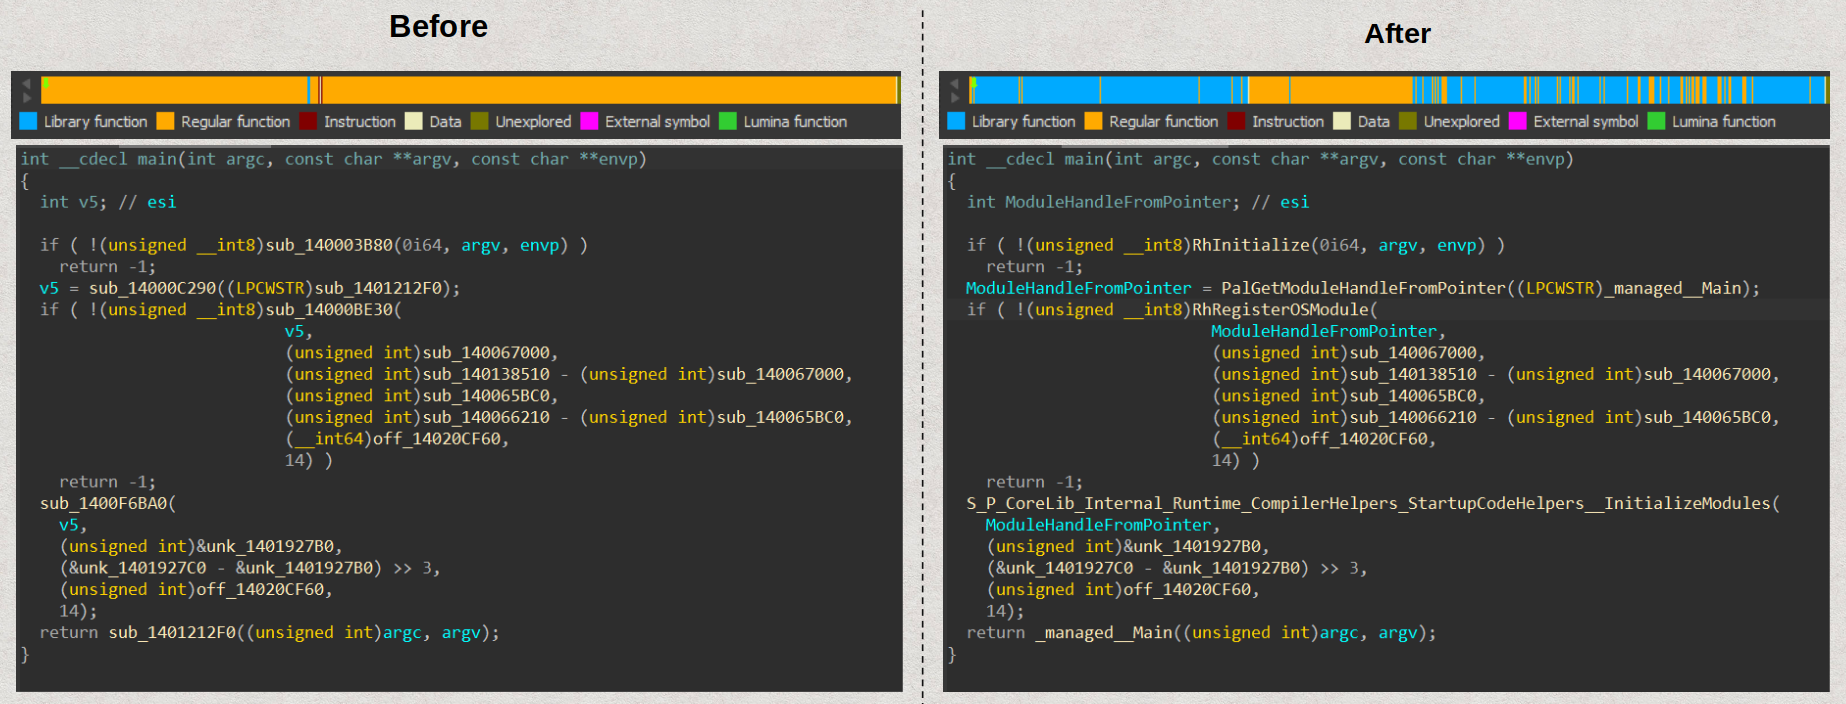
To familiarize yourself with the structure of a .NET AOT binary, you can explore the IDA database with the signatures applied. Here is the pathway from the entry point to the actual .NET main function:
Start (Entry point) --> __scrt_common_main_seh --> main --> __managed__Main.
1.2.2 Bouncy Castle Cryptography Library
I made it my goal to identify and label more library functions, so I searched for “signatures” of libraries within the binary. In this case, I found that the BouncyCastle, an open-source .NET cryptography library, was missing from my FLIRT signatures. I discovered the link to the library’s GitHub repository in the binary’s strings: https://github.com/bcgit/bc-csharp.
You can now use a generative AI model to generate the source code for another donor sample that use Bouncy Castle .NET library. With the source code, use the commands below to build the binary:
dotnet new console --aot -o bouncy-castle-symbols-donor
cd bouncy-castle-symbols-donor
dotnet add package BouncyCastle.Cryptography --version 2.4.0
# Modify content of Program.cs
dotnet publish -r win-x64 -c Release
Next, generate and add the signatures to the IDA database so you can fully appreciate the results:

As excited as I was, there was still a lot of work ahead, so let’s keep going!!
1.3 Hydrated Section
The next obstacle in analyzing AOT binaries is the dehydrated or uninitialized hydrated section. This section is only populated during the early startup phase with runtime data structures, including MethodTable. For more details, you can refer to this Git pull request.
To obtain the re-hydrated data, you can debug and run the binary until the hydrated section gets repopulated in IDA, after which you can take a memory snapshot.
I preferred to keep it static within IDA, so I used x64dbg to dump the hydrated section to a file. I then loaded this file into the IDA database of the binary. When doing this, ensure that you set the Loading segment to 0x0 and the Loading Offset to the start address of the hydrated section. Additionally, uncheck both Create segments and Code segment. It’s also crucial to rebase the IDA database to match the same base address used in x64dbg to align with the populated addresses.
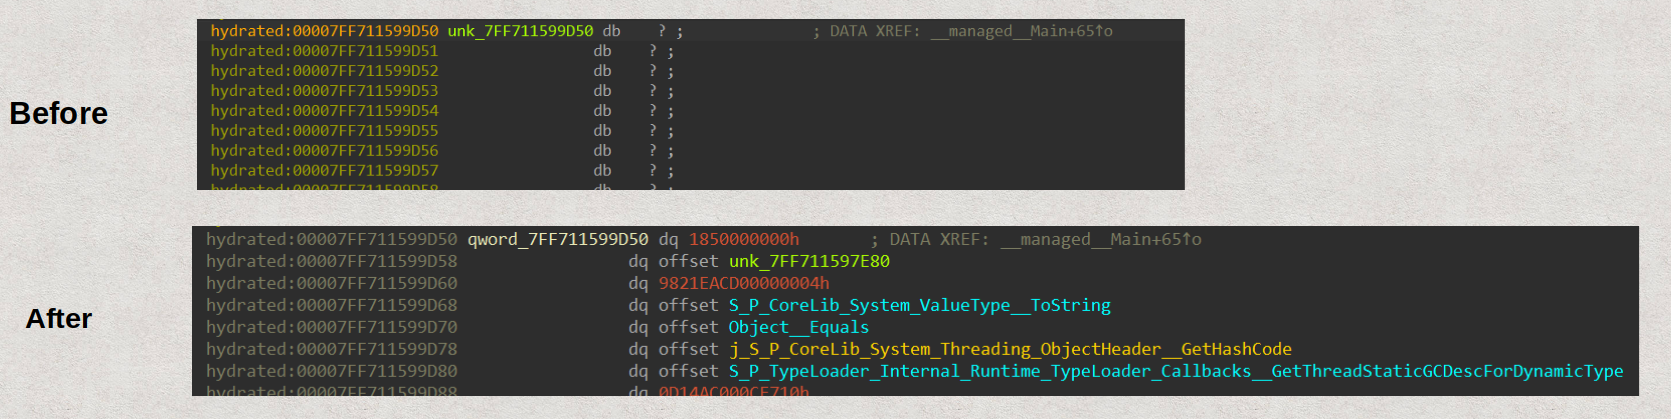
Below is an example of the same memory address before and after loaded the re-hydrated section in IDA:
1.4 Reverse Engineering The Binary
I have gathered everything I need to begin statically reversing the binary. It’s important to remember that the main goal is to decrypt the captured network traffic found in the provided .pcapng file.
1.4.1 String Decryption
One of the keys to speed up the process of reversing this binary is the string decryption function. The main logic of this function has been decompiled as follows:
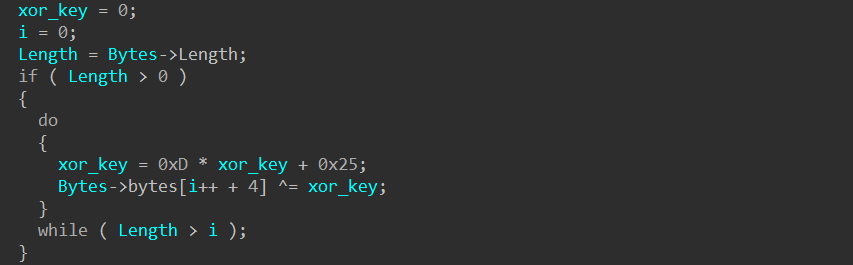
The screenshot below illustrates an input of the function:
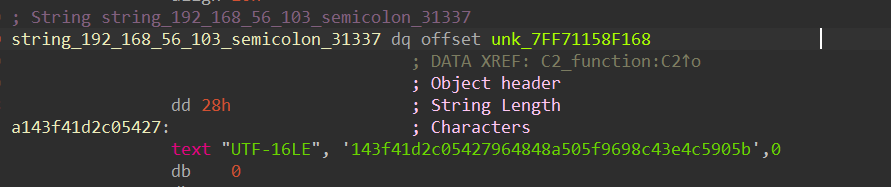
The corresponding output is "192.168.56.103;31337", which the program uses to establish communication. This aligns with the evidence found in the .pcapng file.
Another example of an encrypted string is as follows:

The string will be decrypted to: "133713371337133713371337133713371337133713371337133713371337133713371337133713371337133713371337", which will be used to construct a 384-bit integer number. The number is used as a twist in the ECDH key exchange phase and will be explained later in this blog.
1.4.2 ECC Paramters
Following references to the string decrypt function, I discovered the following function:
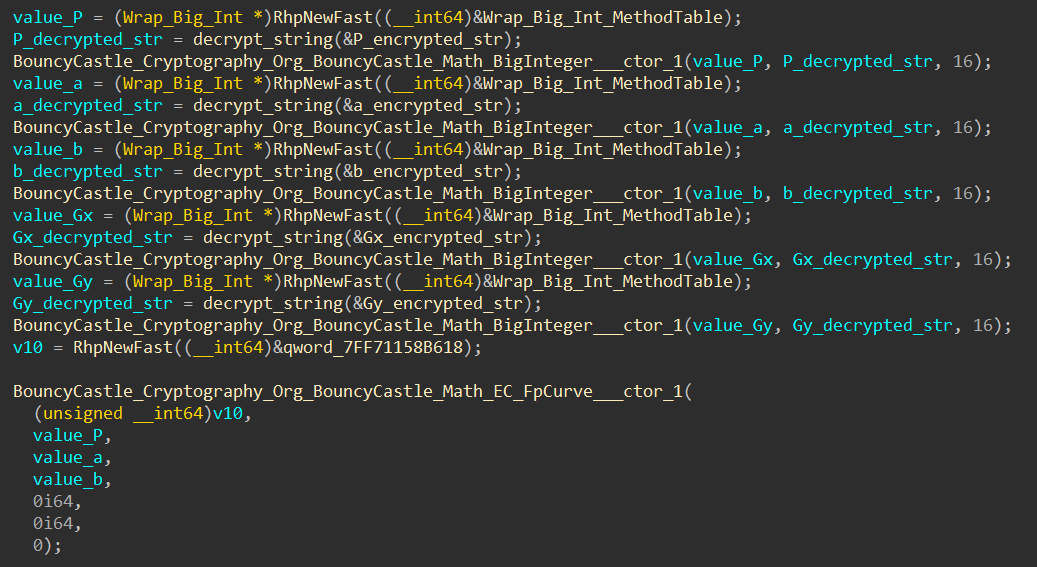
With the aid of the function signatures I created, it is clear that this function generates an Elliptic Curve defined by:
y^2 = x^3 + ax + b over a finite field of size P.
The ECC parameters are stored as encrypted strings, which will be decrypted and converted into numerical values before used. I have extracted the ECC parameters and listed them below for your convenience:
p = 0xc90102faa48f18b5eac1f76bb40a1b9fb0d841712bbe3e5576a7a56976c2baeca47809765283aa078583e1e65172a3fd
a = 0xa079db08ea2470350c182487b50f7707dd46a58a1d160ff79297dcc9bfad6cfc96a81c4a97564118a40331fe0fc1327f
b = 0x9f939c02a7bd7fc263a4cce416f4c575f28d0c1315c4f0c282fca6709a5f9f7f9c251c9eede9eb1baa31602167fa5380
G_x = 0x087b5fe3ae6dcfb0e074b40f6208c8f6de4f4f0679d6933796d3b9bd659704fb85452f041fff14cf0e9aa7e45544f9d8
G_y = 0x127425c1d330ed537663e87459eaa1b1b53edfe305f6a79b184b3180033aab190eb9aa003e02e9dbf6d593c5e3b08182
1.4.3 Key Exchange
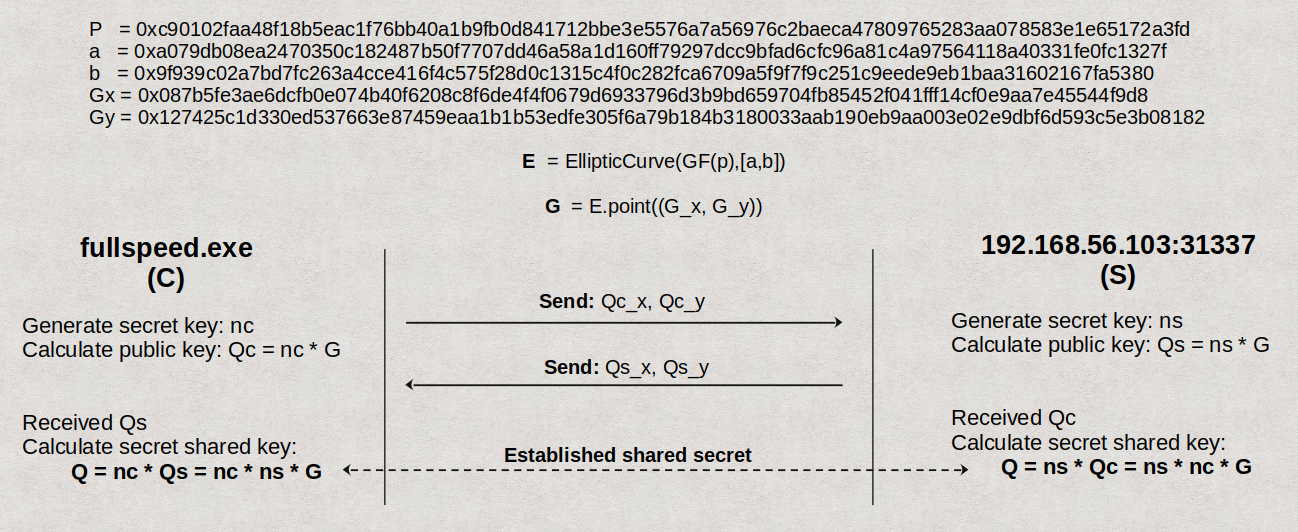
Elliptic-curve Diffie–Hellman (ECDH)
Let’s review the ECDH key agreement protocol, which is utilized in the binary. To help clarify the parameters used, I have included their values in the scheme:
Key Takeaways:
- Public information:
P, a, b, Gx, Gy, E, G, Qc, Qs - Private key of C:
nc - Private key of S:
ns - Shared secret between C and S:
Q
A Little Twist
Although the ECDH scheme does not require the public keys to be obscured, the author has chosen to encrypt the public keys by XOR-ing them with the number 133713371337133713371337133713371337133713371337133713371337133713371337133713371337133713371337 before sending them over an insecure connection:

Similarly, the public key received from the remote server must be decrypted using the same XOR key before it can be used.
Side Note: The use of XOR in this case can be classified as a security through obscurity technique. While it may seem that this approach enhances the security of the ECDH protocol, it actually does not. One might argue that it complicates the task for attackers, which could be seen as beneficial. However, this added complexity can inadvertently weaken a robust security scheme that is already in place. Furthermore, a non-standard security approach requires separate detailed and classified access documentation within a team, leading to more challenges for a company than the potential benefits it may or may not offer. It always better to choose a proven secure algorithm that you can relay on to start with.
Extract The Public Keys
Having acquired knowledge about the key exchange scheme and the public key obscurity technique, I successfully extracted the public keys from the .pcapng file:
Qc_x = 0x195b46a760ed5a425dadcab37945867056d3e1a50124fffab78651193cea7758d4d590bed4f5f62d4a291270f1dcf499
Qc_y = 0x357731edebf0745d081033a668b58aaa51fa0b4fc02cd64c7e8668a016f0ec1317fcac24d8ec9f3e75167077561e2a15

Qs_x = 0xb3e5f89f04d49834de312110ae05f0649b3f0bbe2987304fc4ec2f46d6f036f1a897807c4e693e0bb5cd9ac8a8005f06
Qs_y = 0x85944d98396918741316cd0109929cb706af0cca1eaf378219c5286bdc21e979210390573e3047645e1969bdbcb667eb
You can now jump right into the cryptanalysis step. I want to keep the structure of this blog, so I’ve moved this step to the next stage.
1.4.5 Command and Control
The binary is a simple backdoor that supports three commands:
cd|<directory>: Change the current directory to<directory>.ls: List files.cat: Read file content.
The program continuously receives and executes each command in a loop. It’s certain that the content of the flag was read through the cat command. This means I had to crack the cipher used by the binary to retrieve the content of the flag from the captured data.
Stage 2 - Cryptanalysis Elliptic-curve cryptography
2.1 A Non-standard Elliptic Curve
The parameters of the elliptic curve used by the binary are non-standard. Therefore, I started by testing these parameters to identify any weaknesses. You can use this handy script for testing.
I found the ECC challenges on CryptoHack to be an excellent introduction to exploiting weaknesses and cracking non-standard elliptic curves.
The order of the elliptic curve used is quite smooth (I used Sage):
sage: print(E.order().factor())
35809 * 46027 * 56369 * 57301 * 65063 * 111659 * 113111 * 7072010737074051173701300310820071551428959987622994965153676442076542799542912293
If the prime factors are small, Pohlig–Hellman algorithm can crack the private key in just seconds or minutes, regardless of the key size. However, in this case, the largest prime factor is still relatively large, making it impractical for me to crack the key on my PC in a timely manner using this weakness alone.
2.2 Size Does Matter … In Cipher
The elliptic curve parameters found in the binary, as well as the public keys located in the .pcapng file, are 384-bit numbers. To provide some context, at the time of writing this blog, most ECC (Elliptic Curve Cryptography) certificates utilize 256-bit ECC keys, which are equivalent in security to 3072-bit RSA keys. Therefore, if the binary employs 384-bit ECC keys, it would be equivalent to 7680-bit RSA keys (reference).
Despite the large size of the elliptic curve parameters, the private keys (nc) generated by the binary are significantly smaller, measuring only 128 bits:
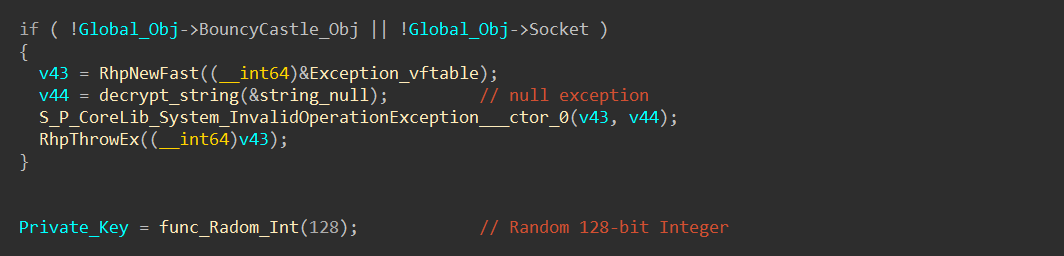
If the product of the smaller prime factors (35809 * 46027 * 56369 * 57301 * 65063 * 111659 * 113111) of the order results in a value of 128 bits or more, I could have cracked the private key using the Pohlig–Hellman algorithm.
Unfortunately, the product is only 112 bits - so close!! This is where brute force could be useful.
To better understand the math behind the Pohlig–Hellman algorithm, you can explore its details and consider how to use its results to facilitate a brute force attack. If you aren’t familiar with modulo operations, it may take some time to grasp, but I promise it will be worth your effort!
I’ve come up with a simple way to explain the concept, which I believe will help clarify the algorithm for you:
- Choose a random 128-bit private key, for example:
0x91919191919191919191919191919191. - Calculate the corresponding
Qc = nc * G - Use the Pohlig-Hellman algorithm to obtain the 112 bits key from
Qcwith the smaller prime factors (35809, 46027, 56369, 57301, 65063, 111659, 113111), resulting in0x9fc4bbdc5c1f76c21a11fef9d46. - Now calculate
mod(0x91919191919191919191919191919191, (35809 * 46027 * 56369 * 57301 * 65063 * 111659 * 113111)). You will find that the result is also:0x9fc4bbdc5c1f76c21a11fef9d46. - This means
<actual private key> = k * (35809 * 46027 * 56369 * 57301 * 65063 * 111659 * 113111) + <result from Pohlig-Hellman>. The search space forkis2^(128-112) = 2^16.
I hope this explanation helps!
2.3 Cracking The Private Key
Putting all the pieces together, I wrote a script to crack the private key:
from sage.all import *

# Define the curve
p = 0xc90102faa48f18b5eac1f76bb40a1b9fb0d841712bbe3e5576a7a56976c2baeca47809765283aa078583e1e65172a3fd
a = 0xa079db08ea2470350c182487b50f7707dd46a58a1d160ff79297dcc9bfad6cfc96a81c4a97564118a40331fe0fc1327f
b = 0x9f939c02a7bd7fc263a4cce416f4c575f28d0c1315c4f0c282fca6709a5f9f7f9c251c9eede9eb1baa31602167fa5380

F = GF(p)
E = EllipticCurve(F, [a,b])

G_x = 0x087b5fe3ae6dcfb0e074b40f6208c8f6de4f4f0679d6933796d3b9bd659704fb85452f041fff14cf0e9aa7e45544f9d8
G_y = 0x127425c1d330ed537663e87459eaa1b1b53edfe305f6a79b184b3180033aab190eb9aa003e02e9dbf6d593c5e3b08182

G = E.point((G_x, G_y))

Qc_x = 0x195b46a760ed5a425dadcab37945867056d3e1a50124fffab78651193cea7758d4d590bed4f5f62d4a291270f1dcf499
Qc_y = 0x357731edebf0745d081033a668b58aaa51fa0b4fc02cd64c7e8668a016f0ec1317fcac24d8ec9f3e75167077561e2a15

Qc = E.point((Q_client_x, Q_client_y))

# Step 1: Pohlig-Hellman
primes = [35809, 46027, 56369, 57301, 65063, 111659, 113111]
order = G.order()
subresults = []
factors = []
modulus = 1
for prime in primes:
    _factor = prime
    factors.append(_factor)
    _G = G*(order//_factor)
    _Q = Qc*(order//_factor)
    subresults.append(discrete_log_lambda(_Q, _G, (0,_factor), '+'))

n = crt(subresults,factors)
assert n.nbits() == 112

# Step 2: Brute-forcing the private key:
MAX = 0xFFFFFFFFFFFFFFFFFFFFFFFFFFFFFFFF # Max 128-bit
step = (35809 * 46027* 56369* 57301* 65063* 111659* 113111)
key_candidate = n + step
while  key_candidate < MAX:
    if key_candidate * G == Q:
        print("Secret key =", hex(key_candidate))  # Found the private key
        return
    key_candidate += step

raise ValueError("Private key not found!")
It took about 5 minutes to crack the private key on my outdated PC:
nc = 0x7ed85751e7131b5eaf5592718bef79a9
The shared secret is nc * Qs:
(0x3c54f90f4d2cc9c0b62df2866c2b4f0c5afae8136d2a1e76d2694999624325f5609c50b4677efa21a37664b50cec92c0 : 0x2793143a038955091171acdcb93bb5b369980f1655c6edcdf5476ed12b5f08465637e6536dd63346aabaf7efb64be82 : 0x1)
Stage 3 - Decrypting Intercepted Data
3.1 Intercepted Data
Extracting data from the .pcapng file is straightforward:
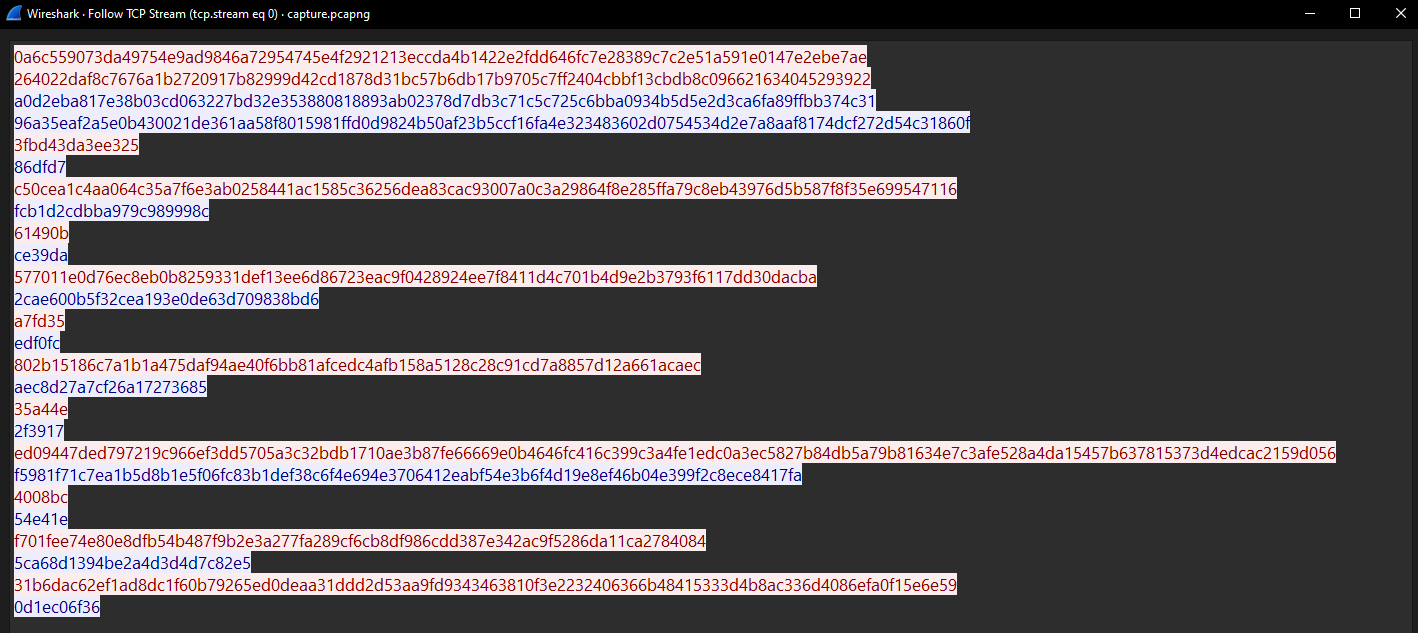
Note:
- Red indicates data from the client.
- Blue indicates data from the server.
For your convenience, I have combined all the encrypted data below:
f272d54c31860f3fbd43da3ee32586dfd7c50cea1c4aa064c35a7f6e3ab0258441ac1585c36256dea83cac93007a0c3a29864f8e285ffa79c8eb43976d5b587f8f35e699547116fcb1d2cdbba979c989998c61490bce39da577011e0d76ec8eb0b8259331def13ee6d86723eac9f0428924ee7f8411d4c701b4d9e2b3793f6117dd30dacba2cae600b5f32cea193e0de63d709838bd6a7fd35edf0fc802b15186c7a1b1a475daf94ae40f6bb81afcedc4afb158a5128c28c91cd7a8857d12a661acaecaec8d27a7cf26a1727368535a44e2f3917ed09447ded797219c966ef3dd5705a3c32bdb1710ae3b87fe66669e0b4646fc416c399c3a4fe1edc0a3ec5827b84db5a79b81634e7c3afe528a4da15457b637815373d4edcac2159d056f5981f71c7ea1b5d8b1e5f06fc83b1def38c6f4e694e3706412eabf54e3b6f4d19e8ef46b04e399f2c8ece8417fa4008bc54e41ef701fee74e80e8dfb54b487f9b2e3a277fa289cf6cb8df986cdd387e342ac9f5286da11ca27840845ca68d1394be2a4d3d4d7c82e531b6dac62ef1ad8dc1f60b79265ed0deaa31ddd2d53aa9fd9343463810f3e2232406366b48415333d4b8ac336d4086efa0f15e6e590d1ec06f36
3.2 Decrypting Data Using A Static Approach
This method allows you to decrypt data without executing the binary. You need to identify the encryption algorithm and its inputs so that you can use external tools or scripts for the decryption process.
In this case, the binary utilizes ChaCha encryption, and the x-coordinate (0x3c54f90f4d2cc9c0b62df2866c2b4f0c5afae8136d2a1e76d2694999624325f5609c50b4677efa21a37664b50cec92c0) of the shared secret is used to form the key. A SHA-512 hash firstly calculated from the value:

Key and IV formation:
- The first 256 bits (32 bytes) are used as the Chacha key:
b48f8fa4c856d496acdecd16d9c94cc6b01aa1c0065b023be97afdd12156f3dc - The subsequent 64 bits (8 bytes) are uses as IV/Nonce:
3fd480978485d818
With the key, IV, and the extracted encrypted data, you can proceed to decrypt:
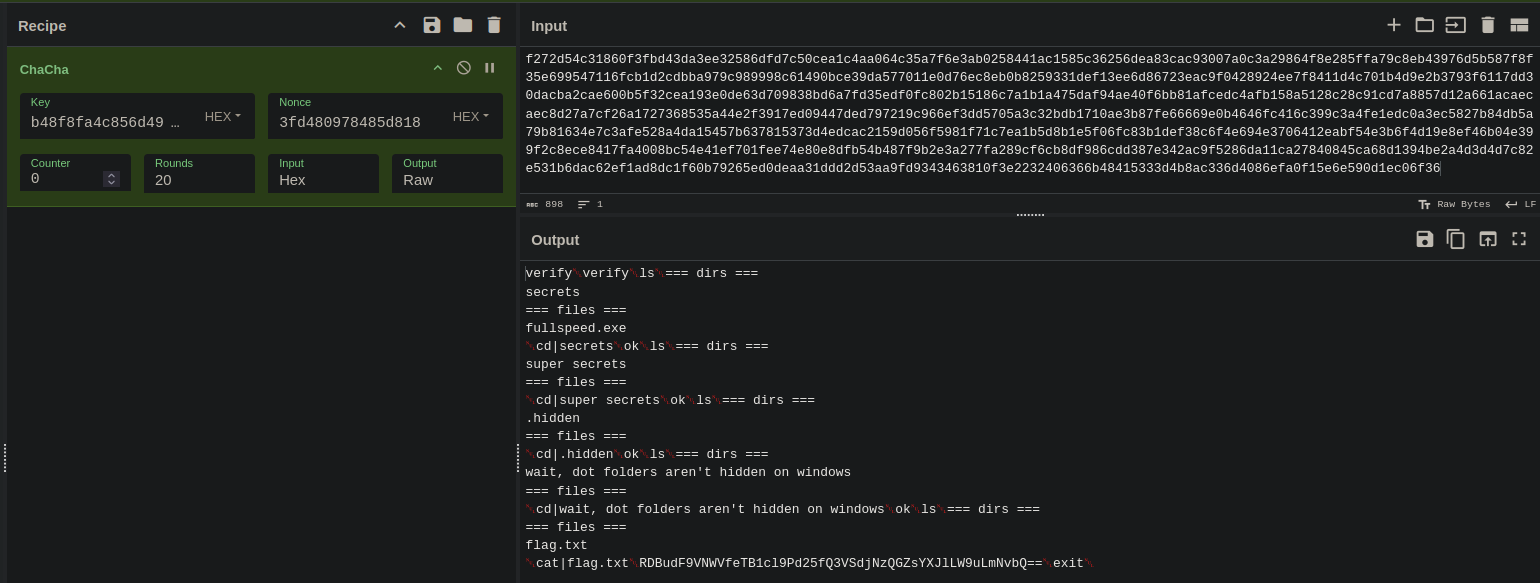
Content of flag.txt:
RDBudF9VNWVfeTB1cl9Pd25fQ3VSdjNzQGZsYXJlLW9uLmNvbQ=
Base-64 decode the content of flag.txt will return the flag: [email protected]
3.3 Decrypt Data Using A Dynamic Approach
For this challenge, I prefer a dynamic approach since it is more fun to debug the binary to get it to decrypt the data. This method does not require identifying the stream cipher used for encrypting the data; however, it does require a thorough understanding of the data structures involved for proper manipulation.
The idea is to recreate the exact environment that existed when the pcapng file was captured, enabling a replay attack. This involves modifying the program to use the same ECC private key, sending the previously captured encrypted data to it, and extracting the decrypted data from its memory at the right time.
3.3.1 Setting Up The Replay Attack Server
To begin, I prepared a fake server for executing the replay attack:
import socket
import binascii


# Create a TCP/IP socket
sock = socket.socket(socket.AF_INET, socket.SOCK_STREAM)

# Bind the socket to the port
server_address = ('', 31337)  # '' means all available interfaces
sock.bind(server_address)

# Listen for incoming connections
sock.listen(1)

print("Listening on port 31337...")


# Wait for a connection
connection, client_address = sock.accept()
try:
    print(f"Connection from {client_address}")

    # Receive and discard client public key - encrypted_Qc_x
    encrypted_Qc_x = connection.recv(1024)

    if encrypted_Qc_x:
        # Convert the received byte array to hexadecimal format and print
        received_hex_str = binascii.hexlify(encrypted_Qc_x).decode()
        print(f"Received encrypted_Qc_x: {received_hex_str}")
        assert received_hex_str == "0a6c559073da49754e9ad9846a72954745e4f2921213eccda4b1422e2fdd646fc7e28389c7c2e51a591e0147e2ebe7ae"


    # Receive and discard client public key Qc_y
    encrypted_Qc_y = connection.recv(1024)

    if encrypted_Qc_y:
        # Convert the received byte array to hexadecimal format and print
        received_hex_str = binascii.hexlify(encrypted_Qc_y).decode()
        print(f"Received encrypted_Qc_y: {received_hex_str}")
        assert received_hex_str == "264022daf8c7676a1b2720917b82999d42cd1878d31bc57b6db17b9705c7ff2404cbbf13cbdb8c096621634045293922"


    # Replay attack: send the same server public key
    server_public_key_hex_str = 'a0d2eba817e38b03cd063227bd32e353880818893ab02378d7db3c71c5c725c6bba0934b5d5e2d3ca6fa89ffbb374c3196a35eaf2a5e0b430021de361aa58f8015981ffd0d9824b50af23b5ccf16fa4e323483602d0754534d2e7a8aaf8174dc'
    connection.sendall(bytes.fromhex(server_public_key_hex_str))
    print("Sever public key was replayed")

    # Replay attack: send the same encrypted data
    encrypted_data_hex_str =  "f272d54c3186413fbd43da3ee34186df41c50cea1c4aa064c35a7f6e3ab0258441ac1585c36256dea83cac93007a0c3a29864f8e285ffa79c8eb43976d5b587f8f35e699547141fcb1d2cdbba979c9899941614941ce3941577011e0d76ec8eb0b8259331def13ee6d86723eac9f0428924ee7f8411d4c701b4d9e2b3793f6117dd30dac412cae600b5f32cea193e0de63d709838b41a7fd41edf041802b15186c7a1b1a475daf94ae40f6bb81afcedc4afb158a5128c28c91cd7a8857d12a661aca41aec8d27a7cf26a1727364135a4412f3941ed09447ded797219c966ef3dd5705a3c32bdb1710ae3b87fe66669e0b4646fc416c399c3a4fe1edc0a3ec5827b84db5a79b81634e7c3afe528a4da15457b637815373d4edcac2159d041f5981f71c7ea1b5d8b1e5f06fc83b1def38c6f4e694e3706412eabf54e3b6f4d19e8ef46b04e399f2c8ece84174140084154e441f701fee74e80e8dfb54b487f9b2e3a277fa289cf6cb8df986cdd387e342ac9f5286da11ca27840415ca68d1394be2a4d3d4d7c824131b6dac62ef1ad8dc1f60b79265ed0deaa31ddd2d53aa9fd9343463810f3e2232406366b48415333d4b8ac336d4086efa0f15e6e410d1ec06f36"
    connection.sendall(bytes.fromhex(encrypted_data_hex_str))
    print("Encrypted data was replayed")

finally:
    # Clean up the connection
    connection.close()
It is important to note that the binary’s decryption process halts once it decrypts a null byte. To prevent this, I changed the last byte of each encrypted data packet exchanged between the client and server to a different byte (For example: 0x41) instead of the original encrypted byte. This modification allows the decryption to continue without affecting the other decrypted values.
Make sure to run the server before executing the binary!
3.3.2 Debugging The Binary
To force the binary to use the same private ECC key, I set a breakpoint immediately after the random ECC key is generated and then overwrote it. To navigate through memory and edit the key, I reverse-engineered the data structures and outlined them below:
struct Wrap_Big_Int
{
  uint64 ObjectHeader;
  Big_Int *Big_Int;
};

struct Big_Int
{
  uint64 ObjectHeader;
  uint64 Size_in_DWORD;
  uint32 *NumberValue;
};
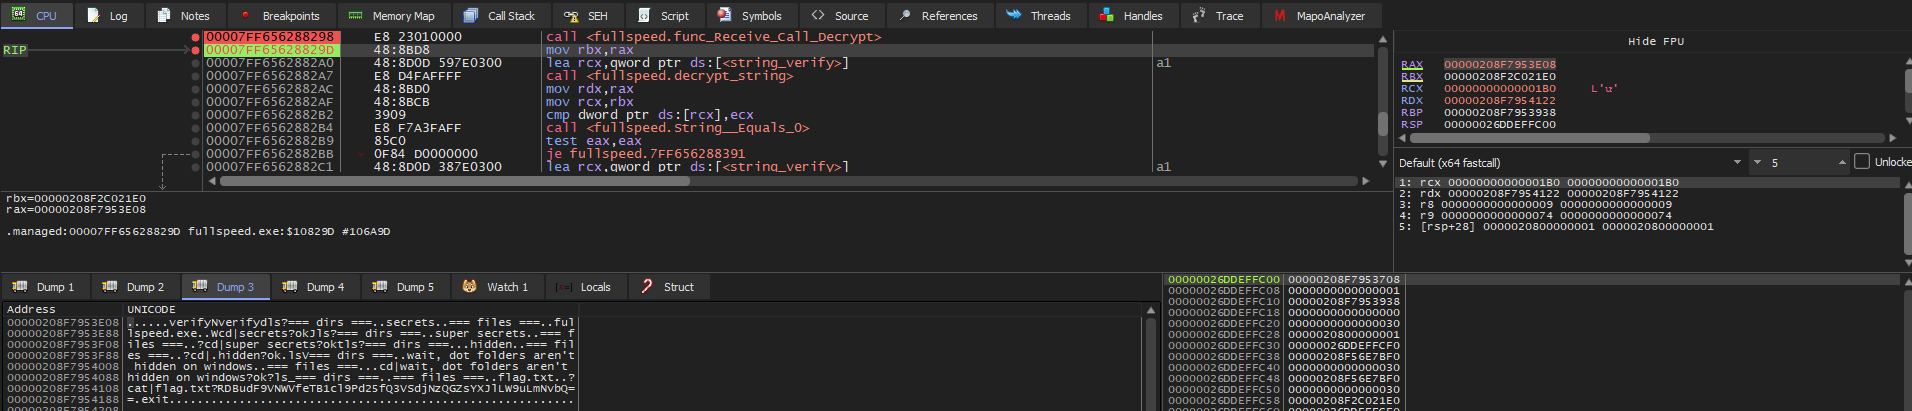
After the random key generation function returns, follow the rax in dump. The data structure that rax points to is Wrap_Big_Int:

Using the structures I provided, follow the Big_Int pointer to access the Big_Int structure. From there, overwrite the NumberValue array:

Important:
Keep in mind that 0x7ed85751e7131b5eaf5592718bef79a9 is the private key. However, it is stored in memory as groups of 32 bits (4 bytes) numbers in little-endian format. Thus, in memory, the key appears as 5157d87e5e1b13e7719255afa979ef8b, as shown in the screenshot above.
I also set another breakpoint immediately after the data is decrypted. By following rax in dump, I obtained the decrypted data:
This resulted in the same flag as the static approach, but it allowed me to confirm my understanding of the program.
Thoughts
In summary, this challenge requires players to reverse-engineer an Ahead-of-Time (AOT) .NET sample to uncover the encryption schemes used and crack the private key due to the implementation of a non-standard ECC. I employed a combination of reverse engineering, dynamic analysis, and network traffic analysis to solve the challenge, and I thoroughly enjoyed the process. Thanks, Sam Kim!